I’ve made these specifically for Jim for the past few years.
Preheat oven to 350F. Sorry. I live in America.
1/2 C unsalted butter (1 stick) softened 80 g white sugar 80 g brown sugar
150 g flour 3 g baking powder 3 g salt
1 egg 5 ml vanilla
200g white chocolate chips
Cream the butter and sugars together until light and fluffy. Add the egg and vanilla, mix until fully incorporated. Add flour, baking powder and salt. Mix thoroughly. Add white chocolate chips. Mix thoroughly.
I use a 2T scoop to measure out cookies, baking them on parchment (I’m lazy) for about 10 minutes, which varies by oven.
1/2 C unsalted butter (1 stick) softened 80 g white sugar 80 g brown sugar
100 g flour 3 g baking powder 3 g salt
1 egg 5 ml vanilla
160 g rolled oats 75 g chopped nuts 73 g raisins
Cream the butter and sugars together until light and fluffy. Add the egg and vanilla, mix until fully incorporated. Add flour, baking powder and salt. Mix thoroughly. Add oats, nuts and raisins. Mix thoroughly.
I use a 2T scoop to measure out cookies, baking them on parchment (I’m lazy) for about 10-15 minutes, which varies by oven.
(I have made a version that added 40 g of coconut to the mix, but it made for a terrible texture. Tasty but not great cookies.)
Based on the Nestle recipe, of course… Yields about 3 1/2 dozen cookies.
Preheat oven to 350F. Sorry. I live in America.
1/2 C unsalted butter (1 stick) softened 80 g white sugar 80 g brown sugar
150 g flour 3 g baking powder 3 g salt
1 egg 5 ml vanilla
170 g chocolate chips 55 g chopped nuts
Cream the butter and sugars together until light and fluffy. Add the egg and vanilla, mix until fully incorporated. Add flour, baking powder and salt. Mix thoroughly. Add chocolate chips and nuts. Mix thoroughly.
I use a 2T scoop to measure out cookies, baking them on parchment (I’m lazy) for about 10 minutes, which varies by oven.
I’ve been making yogurt on and off for many years. Sure, it’s easier to buy it, but it’s significantly less expensive to make it yourself. And it’s easy.
Equipment: 1 gallon insulated drink container 1 large pan thermometer is helpful, but not crucial
Ingredients: 1 gallon whole milk 1 cup live yogurt (plain yogurt, yeah?)
Method: Heat the milk gently until it reaches scald temperature, around 180F, stirring often. You don’t want to burn it… The milk will start to form a skin on the surface. This step alters (or “denatures”) the proteins in milk to make better yogurt. Cool the milk to about 100-110F. A sink full of ice helps here, but simply waiting works too. The milk will feel quite warm on your wrist – a little hotter than you’d give to a baby. Mix in the yogurt, and put it all into the insulated container and leave overnight.
You now have a gallon of yogurt.
To make Greek yogurt out of this, line a colander with a fine clean cloth (i.e. pillowcase fabric) and pour the yogurt into it. I pull the fabric corners up to form a bag, and let the whey drain out over the sink over several hours. Removing some of the whey thickens the yogurt and removes a lot of the sour taste to which a lot of people object.
Well, once again it’s been a while since I posted a recipe, but at least it’s been less than a year.
Over Christmas I discovered babka when a friend gifted us two loaves. It was sinfully delicious, so I thought “I’ve got to learn how to make this”. I of course started with King Arthur. Their web site is packed with good recipes, all slanted, of course, to their products. I don’t mind that – I (almost) exclusively use King Arthur flour. They don’t make a semolina that I’m aware of…
Babka is of “eastern European” origin, coming to America with various waves of Jewish immigration. I’m not a good student of history, so I’ll leave it there. Babka is an enriched bread, meaning it contains sugar, butter, milk, and eggs. This recipe even contains a dash of vanilla.
The essence of babka is its construction. After the dough is risen, it’s punched down and refrigerated for several hours. This stiffens the dough and makes it easier to roll out into a rectangle. That rectangle is covered a filling of some sort, and rolled up like a jelly roll.
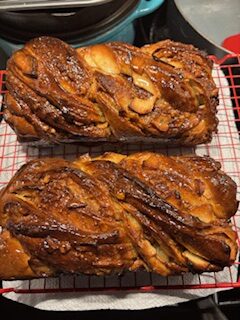
Sliced down the center of the roll, the two halves are then intertwined and placed in a loaf pan for another rise. After rising in the pans for a bit, off they go to the oven for 45 minutes or so at 350F.
As it’s enriched, the dough is more complex than plain bread dough, but it’s worth the trouble.
The Dough
Gather, measure, and arrange your ingredients before starting. I weigh what I can as it’s easier.
360 grams bread flour (King Arthur Organic in my house) 8 grams yeast (Fleischmann’s, of course) 8 grams salt (fine sea salt) 50 grams sugar
2 large eggs 2 tsp vanilla
125 ml warm milk (110F)
70 grams soft butter
Mix the dry ingredients, then add the milk, eggs, and vanilla, mixing well until the dough is smooth, then start adding the softened butter, about 10-15 grams at a time, kneading the dough until the butter is absorbed before adding another piece. The use of a large stand mixer is encouraged for this, although the intrepid can knead it in by hand.
For the dough into a ball. Cover and let rise until about doubled. Roll the dough out onto the counter, and wrap in plastic wrap. Place it in the refrigerator for at least several hours, or overnight.
The Filling
I’ve made a number of babka, either with a chocolate or cinnamon filling. A couple of them had apples slices incorporated as well for a bit of pizazz. Raisins are also optional with the cinnamon filling, as are nuts. Go wild.
Cinnamon Filling
100 grams brown sugar 11 grams cinnamon 4 grams flour 60 grams melted butter 15 ml water Optionally: 60 grams chopped nuts 60 grams raisins Really optionally: 2 apples, peeled and pared, cooked in a dab of butter until soft.
Melt the butter and/or chocolate. Combine the ingredients for either filling, leaving out nuts and raisins for ease of spreading.
Take the dough out of the refrigerator. Very lightly flour the counter, and roll the dough out into a rectangle about 9″ x 18″. Spread the filling evenly over the surface of the dough, all the way to the edges, except for one strip an inch or two wide at one end for sealing. Evenly sprinkle nuts, raisins, and/or apples over the filling.
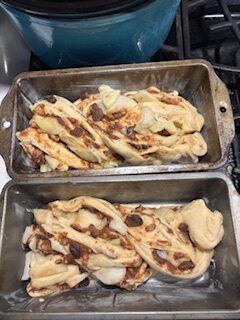
Starting at the filled end, tightly roll the dough to enclose the filling, like a jelly roll. At the end, wrap the clear dough around to seal in all the filling, and roll it onto a cutting board. Now comes the fun. Slice the roll lengthwise down through the center to form two half-rounds of dough. Twist these half-rounds over one another, keeping the halves upright, from one end to the other, like the picture on the left, above.
Transfer to a buttered bread pan (I make two small loaves – it’s easier to share), and let rise again to almost double.
Bake at 350F for 50-60 minutes for a normal loaf, 40-50 minutes for two small loaves.
I’m a bit shocked that I don’t have a Cobbler recipe posted here yet. I’ve been playing with this dessert for a few years, and have come up with a recipe that is highly sought after. I make four of them for a friend as a donation to a local church during their “Bazaar”. Apparently folks have been scouting for them. I (ahem) personally think it’s pretty good.
I’ve been making a peach and blueberry version, but this works with just peaches, or just blueberries, or just about any other like fruit. I bet even apples could be used. I’ll have to try that.
The recipe is pretty much dead simple – only 9 ingredients. Since there’s 1/2C of sugar and 1C of flour, I measure out two 1/2 C of flour to save dirtying a cup. Yes. Engineers think like that.
My recipe card indicates that this recipe originated with Betty Crocker, who taught me to cook eggs in a Griswold skillet when I was about seven. (I remember cooking in one house but not the prior one, so I’m estimating.) I really started learning to cook by helping my mom.
Preheat your oven to 400F.
The Fruit Part: 4-5 C fruit 2 C (1 pint) blueberries 3 T cornstarch 1 T lemon juice 1/2 C sugar
The Dough Part: 1 C AP flour 1/2 T baking powder 1/2 t salt 3 T shortening 2/3 C milk
Assuming peaches as the fruit, the peels must be removed, most easily by blanching in boiling water for two minutes. The skins will slip right off reasonably ripe fruit. Right now (end of June 2024) 90 % of the peaches are rock hard, wherever they’re getting them. It’s worth the time to find riper fruit. Slice the peach flesh from the pit (I don’t bother trying to halve the peaches) and combine with the remaining ingredients. Cook the peach mixture until the mixture thickens and bubbles.
(Here is where I deviate – I add in a pint of blueberries that have been picked over for stems and debris. Add them to the mixture and cook for about a minute or two. No need to adjust the sugar.) The hot fruit mixture helps cook the bottom of the crust, so don’t skip this step. I have. Don’t.
Combine the dry ingredients and cut in the shortening until the mixture is crumbly. I don’t know. That’s what all the recipes say.
Pour the fruit mixture into a 9″ x 9″ dish (I use glass or Fiestaware). Mix the milk into the rest of the dough ingredients, making a smooth, thick batter. Coarsely cover the fruit mixture with the batter. Go ahead. Be fanciful.
Bake the cobbler for 25-30 minutes (depending on your oven) until golden brown.
Let cool for 20 minutes and serve with ice cream or whipped cream.
I kind of got bored with sourdough bread, and I’m not the one who really likes it, so the starters have died off and I haven’t made any sourdough bread in over a year.
I was looking for a bread recipe that would be easier, but still great to eat. My brother-in-law, Larry, just loves my bread, so I bake weekly to keep him supplied. He turned his son onto my bread as well, so I added another weekly loaf. Larry sits with his grandchildren on Fridays, so I bake on Thursday and truck the bread up to Larry. (OK, I also grow lettuce and microgreens, and bring some of that along as well).
I’ve been working on the recipe for over a year, and only in the past couple of months added some shortening. It softens the bread, allows it to stay fresh for another day or so, and even seems to give the bread a bit more chew.
This recipe scales well. I have an index card with an ingredients table for one to three loaves. That table is reproduced here:
1
2
3
Flour
600
1200
1800
Water
360
720
1080
Salt
12
24
36
Yeast
6
12
18
Shortening
20
40
60
Quantities for up to three loaves
The flour I use is King Arthur Organic Bread Flour. I use spring water, fine sea salt, Fleischmann’s Active Dry yeast, and Crisco shortening. I’m truly serious about the flour, and semi-serious about the yeast. Other ingredients can be generic. I buy Crisco out of habit, and buy organic flour not for any perceived health benefits, but for the benefit of the pollinators, without which we would not survive. I find that the shortening does not need to be cut into the dough – it will just mix in nicely. I heat the water in the microwave to about 100F. This offsets the cold of the kitchen and gives the yeast a bit of a jump start.
One loaf is just a little small for the KitchenAid mixer’s dough hook, and two loaves is just a bit too large. Three loaves is out of the question, so I just mix and knead the dough by hand until it’s smooth. I proof the bread until about double, then divide the dough into equal parts, and grease the pans with bacon grease left over from breakfast. The loaves are shaped and put into the pans, and after the final proof, the loaves are scored and baked at 425F for 38-41 minutes in the middle rack. That’s in my oven. Your oven will definitely behave differently.
I haven’t gone over what I use to make the sourdough. Most of it was already on hand just because we cook stuff, but there were a few specialty (read “expensive”) items that aren’t really needed…
One piece of gear you will absolutely need is a kitchen scale that reads in grams up to 10 kilograms or so. Weighing ingredients is much easier than trying to measure by volume. Another smaller scale that reads in tenths or hundredths of a gram is also helpful for weighing salt ( and occasionally, yeast).
I keep and grow my starter in pint canning jars. (Actually, I’ve found that a particular brand of pizza sauce comes in a perfectly-sized jar that oh-so-handily mates with canning lids.) I keep three jars – one for the current culture of sourdough, another for the next culture (daughter, if you will), and a third to grow a batch of starter to make a leaven. [1]
Hopefully a large bowl is obvious. I use a smaller bowl to make the leaven. I have a couple of plastic shower caps that came from (I think) Caesar’s Palace in Las Vegas that I use to cover the bowls between steps. Plastic wrap works.
[1] There’s an engineering method called the “Rubber Duck Technique”, which posits that if you can explain what you’re making to a rubber duck, then you fully understand what you’re doing. In explaining my need for three jars to you (as proxy for the rubber duck), I realized that I really only need two jars.
While I’m thinking of it, I’ll work up what I do to make sourdough bread. Sourdough, to me, anyway, is the technique of using wild yeasts and bacteria to leaven bread. (Don’t be confused. There is a step in which a levain is created. This is just the French term for a pre-fermented portion of the dough. It creates a great deal of flavor.) Sourdough bread does not need to be sour. That one of the aspects that can be controlled. I don’t like the sour bit so much, so I try to control it out to a certain extent.
Anyway, this is my method. The recipe varies somewhat, and follows. These instructions produce two loaves of bread. It’s going to be a bit different this time around as I’m making one loaf and however many rolls I can get out of it for Thanksgiving. Rolls for Thursday means baking on Wednesday. Which means I start on Sunday.
Note that most of my measurements are in grams, not cups and teaspoons. There are two primary reasons for this, and they likely have equal weight, if I’m perfectly honest. One, weighing everything helps in reproducibility. I can make the same bread every time if I’m within a gram or two. Two, I’m lazy. I can weigh everything into one bowl. No cups or teaspoons to wash. And, I don’t have to fiddle with or worry that I’m not getting just the right amount of flour into the cup. (Given my tendency to leave the dishes for Peggy, this results in a higher level of matrimonial bliss.)
Day -3: (baking in three days) Feed the starter and build the bulk starter. I only keep a starter of about 50 grams, and I need 100 grams to make the levain. So I “step up” the starter, and call it bulk starter. I don’t know what other people call it. If I baked more often, I would just keep a bulk starter going all the time, but I’d have to bake every three or four days to justify it.
Day -2: (baking in two days) Make the levain, which is combining more flour and more water with the bulk starter. This will ferment overnight and create a huge amount of flavor. This step also increases the amount of yeast available to make the bread rise. In bakers’ terms, this is a “pre ferment”, in that a portion of the dough (the levain) is fermented prior to making the bread.
Day -1: (baking tomorrow – making the bread today) Autolyze the remaining flour, which allows the development of gluten without all that tedious kneading. All that work your mother taught you to do is only hydrating the flour. Just letting it sit for two hours does the same thing. Go have a coffee. Make the dough by combining the autolyzed flour, salt, and levain. Fold the dough twice to provided structure and tension to the dough. Proof dough until about doubled in size. Divide dough into loaves and pre-shape into rough loaves. Shape dough into final loaves and place in tins or bannetons Proof dough – tins until ready to bake, bannetons just shy of that Refrigerate dough in bannetons (or bake the bread in tins)
Day 0: (baking today) Preheat oven to 450F Pull bread out of fridge Score bread Bake bread with steam Let bread cool
These are my ingredients: fine sea salt – it dissolves more easily than the coarse stuff spring water – filtered would also work, but geez, avoid the stuff with chlorine in it. flour – Not just any flour, though. I use bread flour, what the British call strong flour. It’s simply flour that has a relatively high protein content, from 12-14%, versus 9-11% for all purpose (AP) flour. Whole wheat flour adds texture, flavor, and protein. Whole wheat is also the base of my starter. Rye adds flavor (that apparently some of us don’t like so much.) The amounts are included below, but here is a list of the flours I use, just to be organized: King Arthur Organic Bread Flour (12.7% protein) King Arthur Organic Whole Wheat Flour (13.8% protein) Bob’s Red Mill rye flour
John rants: I use organic ingredients not because I think they are superior to, or in any way are more healthy than, “ordinary” foodstuffs, though that’s probably true. I use organic whenever I can to protect the pollinators, all of which are endangered by the indiscriminate use of pesticides.
Bread doesn’t stick to the basket when dusted with a mixture of rice flour and bread flour. Bread slides on the peel when the peel is dusted with cornmeal. (So that’s why my bread has cornmeal on the bottom…) Bob’s Red Mill cornmeal Bob’s Red Mill rice flour
Now, to make bread:
To make the bulk starter(Day -3)( 10-15 minutes):
5 grams starter (50/50 mix of whole wheat flour and spring water)
60 grams whole wheat flour
60 grams spring water
To make the levain(Day -2)(10-15 minutes):
100 grams bulk starter
120 grams spring water
180 grams bread flour
The autolyze (Day -1)(15 minutes):
75 grams rye flour
75 grams whole wheat flour
620 grams bread flour
530 grams spring water
Finally, the dough ( Day -1)(30 minutes):
20 grams fine sea salt
The starter is a 50/50 mix of flour and water (give or take whatever biological action take place), so 100 grams of starter is 50 grams of water and 50 grams of flour. Thus the levain consists of (180+50=230) grams of flour and (120+50=170) grams of water.
To that we add another (75+75+620=770) grams of flour and 530 grams of water, totaling 1000 grams of flour, 700 grams of water, and 20 grams salt.
In so-called “bakers’ percentage”, this dough is considered 70% hydrated, because there is 70% as much water by weight as flour : 700 g water / 1000 g flour = 70%. Salt is usually added at about 2% of the flour weight – 20 grams in this case.
Now the details. The times are merely rough guidelines. Your kitchen may be warmer or colder than my kitchen, and temperature matters. A lot. Warmer kitchens tend to promote faster yeast and bacterial action. Not surprisingly, colder kitchens slow things down. So this is a game of watching the dough, listening to what it’s telling you. All ingredients are at room temperature, which varies probably 60-70F during the winter in my kitchen.
“20” g water“20” g flour and a bit of “before” starter
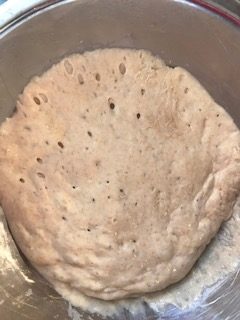
Day -3: Making the bulk starter is easy. If you feed your starter at the same time, there’ll be no extra dirty dishes. It’s the only sensible thing to do. My recipe calls for 100 g of starter for Day -2. 60 g of whole wheat flour and 60 g of spring water are combined with a bit of starter. Mix it well and loosely cover for about 24 hours. Tomorrow there will be enough starter to make the levain. These pictures are clearly of making the starter. The bulk starter is just three times bigger. I tend to do this step before going to bed.
Day -2: Still a pretty easy day, making the levain. Measure out 100 g of bulk starter into a bowl. Measure out 120 g of spring water, and mix well with the starter. Mix in 180 g of strong white flour until all of the flour is combined and no dry flour remains. Cover and leave for 12 hours or so. I also do this before going to bed to allow breadmaking to start after breakfast. Yes, retirement is nice.
Levain is ready
Day -1: Making the bread consists of a number of steps, each of which is easy. We just have to combine them. Your levain has been growing for about ten hours, and will be in peak shape in another two. It’s time to autolyze the flour. Weigh out 770 g of flour – my normal mix is 75 g rye, 75 g whole wheat, 620 g bread flour – into your bread bowl. Weigh out 530 g of spring water. Weigh out 20 g of fine sea salt. I measure the salt at this point because I forgot it once. Never forget salt in your bread. Never. Really. Never.
Mix the water and flour until all the water is absorbed and there are no dry bits of flour. This is the autolyze step, which allows gluten to develop without all that tedious kneading your mother taught you. Cover the bowl and go have a coffee, or run an errand.
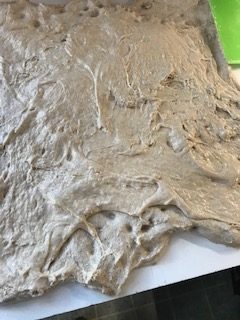
Spread out and dimpledLevain spread out
Autolyze for thirty minutes to two hours, then turn the dough out onto a wet counter. Wet your fingers, then spread the dough out into a large rectangle, like making pizza.
Dimple the dough with your fingertips, and sprinkle the salt evenly over the surface. Turn the levain out onto the dough, and spread it out evenly.
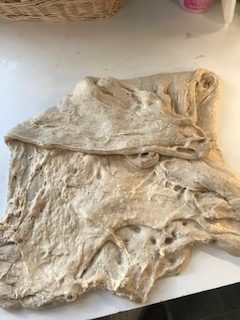
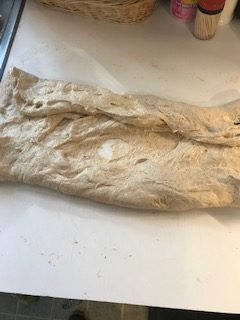
Folding over the doughFolding levain into the autolyzed dough
Use a bench scraper to fold the dough from the edge to the center, overlapping to contain the levain, keeping your fingers wet to keep the dough from sticking too badly.
Pull the dough toward you, stretching it, and fold it back over itself. Turn the dough, and repeat this folding action until the levain is mixed in and the dough is a homogenous mixture. Scrape the counter clean and place the dough in the bowl to rest for 20 minutes.
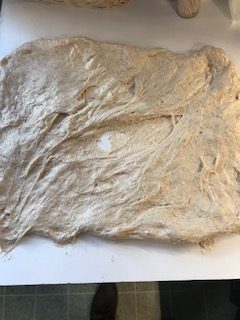
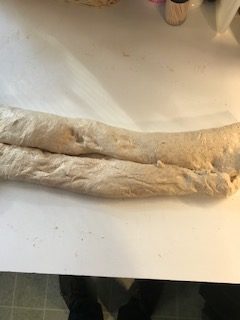
Spread out like a pizzaEdges folded inAnd folded in again
The next two steps are simple folds: wet the counter and your fingers again, and turn the dough out. I like to spread the dough out like a square pizza. Then I fold one-quarter side to the middle, then the other quarter to the middle.
Ends folded inAnd folded in againThis the “good” side now
Fold the ends in toward the middle again, then fold that. Put the dough back into the bowl for another 20 minute rest, with the outside of the fold facing up. This is now the “good side” of the bread.
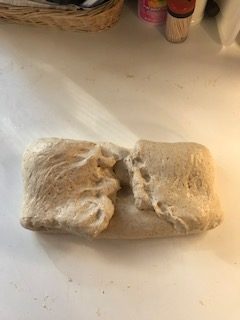
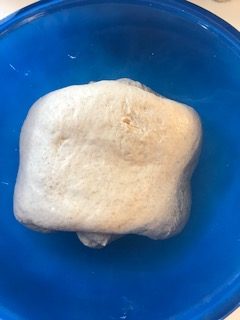
After resting for twenty minutes or so, do another fold as before. Put the dough back into the bowl for proofing again with the “good side” up. Leave the dough in the bowl on the counter until it has about doubled in size. Flour the counter, flour the dough in the bowl, and turn the dough out onto the counter. Weigh the dough and cut into two equal portions. Preshape each portion into a rough loaf, cover, and set aside to rest for 20 minutes.
Place the loaves in bread tins for baking after another proof. When the bread has again almost doubled in size (the crown should be peeking out of the bread tin), it’s time to bake. 375F for 30 minutes? I am guessing. I’ll have to test that.
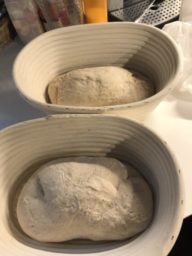
Or, place the loaves in bannetons, wicker baskets made for proofing and fermenting sourdough bread.
The bannetons are dusted with a mixture of wheat and rice flour, and the loaves are place good side down.
After the bread has about doubled in size (the dough should yield to a finger, and should not spring right back), the bread is refrigerated at least overnight, to develop flavor as it continues to ferment. The action of the yeast is reduced, but the lactic acid bacteria that produces the sour taste continue to work. Longer fermentations produce more sour taste due to more bacterial action.
After their overnight stay, the loaves are scored and baked on a preheated pizza/baking stone at 450F for 40 minutes. Steam is added at the beginning of the bake (a cup of water in a preheated Dutch oven lid) to ensure a crispy exterior. Alternatively, a round boule can be baked in a preheated Dutch oven. When the oven beeps to indicate it’s up to heat, the cast iron Dutch oven will still be cold – give it at least a half hour. Then roll the boule out onto a square of parchment, score, and lower it into the Dutch oven and cover. Bake for 20 minutes, remove the cover, and bake for another 20-25 minutes.
Scoring the crust of the bread creates a path for the bread to expand while it bakes. If you haven’t supplied an easy path by scoring, the expansion will occur in random places – this rarely makes for a pretty loaf of bread. I use a razor blade, and try to cut at least 1/2″ (12mm) deep into the crust. Shallow cuts can be decorative, but a deep one is needed for expansion. Bread baked in tins don’t require scoring, as the sides of the tin prevent expansion out, to it has to go UP.
There is a lot more detail to it in practice, but following these steps will result in bread. And pretty good bread at that. It will only improve.
The heart of sourdough bread is the starter, which is a mix of flour and water that contains wild yeasts and bacteria. These yeasts and bacteria, rather than commercial yeast, provide the leavening so the bread rises.
It’s easy to keep an established starter happy and healthy. It might seem wasteful (this can be addressed), but the starter has to be “fed”, a misnomer I think meant to confuse the novice. What really happens is that a little bit of the “before” starter is added to a mixture of flour and water to make the “after” starter. This process is repeated every three or four days at room temperature. Refrigeration will slow things down, but I’m not experienced in that – I once put the starter in the fridge when I was gone for a week. It lived. That’s all I know.
But my starter began as 100 g each of spring water and King Arthur Organic Whole Wheat flour. I just mixed that up and put it in a pint canning jar with a loose lid. Yeasts and bacteria that naturally exist in the flour were activated. Subsequent feedings increased the microorganic population, and after a week or so, the starter was ready to use.
John Rants: Many will say that the yeasts “in your environment” are what makes “your sourdough” special, but mostly it’s wheat-specific yeasts that live on the wheat plants. Kind of like nature, right? Huge variety, to be sure, but I don’t think it’s “you”. But I was a software engineer. What do I know?
Continued care of the starter consists of feeding it every three days or so. I will with clear conscience admit that I have let this slip to likely a week. Three-day-old starter is nice and bubbly, and smells yeasty and a little sour. Seven-day-old starter looks like it’s died and smells like old socks. But feed it. It’ll be fine.
My feedings occur primarily when I think of it, but fortunately I keep the starter on the kitchen counter, so it’s never too far out of sight. In a pique of experimentation, I created a starter using whole wheat flour. My prior starter was based on strong bread flour, and worked quite nicely, but I wanted more flavor. I was surprised to see that the newly-created whole wheat starter showed signs of activity after only two days. I fed it generously (100 g water / 100 g flour / teaspoon of “before” starter) once again, and after two more “normal” feedings, I was making bread.
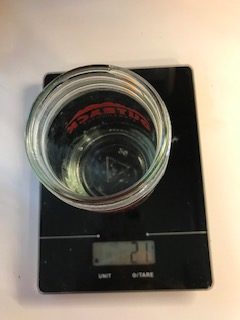
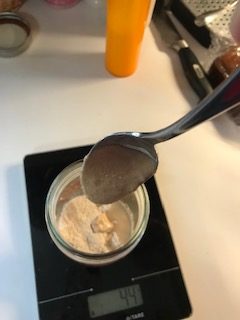
A “normal” feeding involves weighing out equal parts water and flour (20 grams is my goal, but it’s tough to pour grams of water). I hit 21 this time (below). So I used 21 grams of flour simply to make it equal parts. And then I mixed in just a tiny bit of “before” starter. I’ll cover that loosely and set it aside for two or three days.
“20” g water“20” g flour and a bit of “before” starter
When it’s time to make bread I’ll build a large starter in addition to a normal one. For my bread recipe I typically need 100 g of starter, so I’ll branch off with 60 g water, 60 g whole wheat flour, and a teaspoon or so of “before” starter, and the next day that’ll be ready to make the levain. So much more “before” starter is used because there’s a lot more flour to consume, and this large starter has to be ready on time. I allow a day for this large starter to be ready.
It’s getting pretty clear I’m going to have to get one of those cool blogging cameras…