Thanksgiving Dinner

Thanksgiving was a small affair this year, just Peg (the blog’s namesake) and me. Ordinarily I’d have helped out with a pie or something, but I did the whole shebang today. Turkey, mashed potatoes, stuffing, gravy, roasted brussels sprouts, cranberry sauce, and pecan pie. All very straightforward, most I’ve done before, but I managed to pull it all together, mostly on time.

The turkey was a 12 pound Jenny-O, roasted according to the package instructions (325F for about 3 hours and a bit).

Four potatoes (about 1.5# were peeled, roughly cubed, and boiled until done (tender by fork and tasted “done”) with 2 T of butter and a splash of milk.

I cheated on the stuffing and got Pepperidge Farm Country Style, which is really easy and really good. That was prepared with 4T butter, one can of chicken broth, and about a teaspoon of dried onion. Melted the butter, heated the broth, mixed in the stuffing, and put it all in a casserole which went into the oven a few minutes before the turkey came out.

Brussels sprouts I made according to a recipe I found here( and of course I bookmarked it!). I did eliminate the garlic because it’s not Peg’s favorite. This turned out great, by the way!

The pecan pie was made according to the classic Karo Syrup recipe which turns out to be the “family secret” after years of everybody raving over my Aunt Glenna’s Pecan Pie. I did forget to include the butter, but it turned out great just the same, making me think the butter isn’t really needed. The pie shell stuck in the Fiestaware pie plate though, so next time it will get sprayed. It doesn’t matter, but I used the dark syrup. The web site says either will do, and I’ve used both to good effect in past years (and of course I claim the recipe is a “family secret”).

Cranberry sauce? Ocean Spray, of course. What else could we serve in Massachusetts?

And the gravy was dead straightforward. There was about a cup of drippings in the turkey pan, with hardly any fat. I melted 2T of butter in a saucepan, added 3T of flour, and made a relatively dark roux, then added the drippings and one cup of milk, with a little salt and pepper, and cooked that until it was thickened a bit.

It turned out lovely.

Thanks and Happy Thanksgiving!

John

Why I haven’t posted in a long time

I just noticed that I hadn’t visited here since June. There’s a good reason. Look at the recipe for Dutch Oven Chicken, for example. You end up with a whole chicken! Peg and I both had bariatric surgery, she at the end of June, and me in the middle of July. This surgery hugely impacts the amount of food we can eat, though not so much what we can eat. I tend to still have protein shakes for breakfast and lunch, but “regular” food for dinner.

But we can eat only a fraction of what we used to eat. This whole chicken, for example, would be meals for two, maybe three nights. Now, one whole chicken can last us a week! I might have one chicken leg and a cup of spinach, say, for dinner, and the next night a thigh and a cup of green beans.

That said, I am working on some recipes that produce smaller servings, and fewer of them.

In a positive vein, Peg has lost more weight than me, and I’m down nearly 70 pounds.

Be well,
John

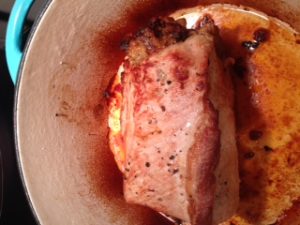
Stuffed Pork Roast

I looked around on the internet for recipes to try, and came up with very close to bupkis. So I made something up. All of the stuffing recipes contained onions or shallots, and some bread. Wow. What imagination. The only smart thing they did was to cut a hole through the middle of the roast rather than cut it open and fill it like a jellyroll.

Herewith, my take on Stuffed Port Roast. I had a chance to get a sample to Peggy, and I had a sample the following day. Four thumbs up. I think it turned out better than I expected.

Preheat your oven to 350F.
pork
1 boneless pork roast, 3-4#
3 T vegetable oil, divided
2 medium shallots, diced
8 dried apricots, diced
8 dried plums (prunes for those over 50), diced
1 C bread crumbs (I cubed a dinner roll into a 1/4″ dice)
salt, pepper
1/2 t ground sage (because it’s pork)
2T water
1t chicken base (we use Better Than Bullion brand for just about everything)

Dice the shallots, apricots, and prunes, then saute in 1 T vegetable oil until the shallots are tender. Mix with the bread. Dilute the chicken base with the water, add to the stuffing, and mix is all up well.

Compress the pork roast from the ends, like a large filet mignon, and with a long knife, stab through the center – lengthwise – of the pork roast. Flip the roast end-for-end and stab again, taking care to align the hole in the roast. Use your fingers to open the hole as wide as possible, and fill the cavity with stuffing. Turn the roast, again end-for-end, and stuff from the other end, until the roast is firmly stuffed. Salt and pepper all four sides of the roast to your liking.

Heat the remaining vegetable oil in a Dutch oven, and sear the roast on four sides. Cover, and place in the oven for 45 minutes. Temp in the stuffing should reach at least 145F. (USDA is now calling for 140F for pork – it used to be 160F, but that always made for pretty dry meat.)

Rest the roast, covered, for 10-15 minutes, slice and serve.

You can make gravy with the drippings, which are mostly rendered fat if you’d like. For each T of drippings, add 1 T of flour, and cook to form a roux. For each T of drippings, add 1/2 C of milk or chicken stock (made from chicken base, just sayin’), stir and cook until you like the consistency, about 5-10 minutes.

Dutch Oven Chicken

For last Christmas, Peg unexpectedly bought me a Dutch Oven, not that we didn’t already have one. This one is enameled cast iron, unlike the plain cast iron models that we also own. So it’s pretty, and very easy to clean.

The dish is nearly trivial to make, and consists of only six ingredients:
1 whole chicken
1 onion, halved and thinly sliced
salt to taste
pepper to taste
2 T vegetable oil
3 T AP flour

Preheat your oven to 350F.
Pour the oil into the Dutch oven and preheat over a medium high flame.
Rinse the chicken and dry it with paper towels.
Season both top and bottom of the chicken with salt and pepper.

Place the chicken in the Dutch oven breast-side down, where it will cook for five
minutes or so, until the chicken is browned nicely. Watch it for sticking.

While the chicken is browning, you have time to cut and slice the onion.

When the chicken is browned nicely, turn it over to brown the other side. Add the onions to the pot, along the sides. Cover the pot and place it in the pre-heated oven for 45-50 minutes. (My first attempt ran 55 minutes and it was a bit overdone). Set a timer.

When the timer expires, check the thigh with a meat thermometer. The chicken should reach a temperature of 165F to assure it’s done. Remove the chicken to a plate and let it rest.

Pour the onions, fat, and juices into a heat-proof container. Use a ladle to save 3 T of the accumulated fat, and put that back in the Dutch oven. Discard the remaining fat, but retain the other juices. Combine the flour and oil, cooking over medium heat to form the roux for the gravy. When the roux is cooked and smooth, add the onions and remaining juices to the Dutch oven, stirring well to avoid lumps, and cook for several minutes until well-mixed and thickened. If the gravy is too thick, add milk until the consistency is to your liking. A submersion blender may be used to advantage here, but it’s not really necessary. Add salt and pepper to taste.

Carve the chicken and serve with the gravy.

I think it turned out very well. Peg claims that she’s not going to cook any more.

Deviled Eggs, Part Deux

I made deviled eggs again for Easter, and got a lot of compliments on them, so I think I have a final recipe.

The eggs:

1 dozen eggs, plus a couple spares. If they peel nicely, you’ll have too many, but I judge “too many” as more than I can fit in the 20-cavity tray I use.

Eggs are best prepared a day in advance [1]. Best if put in the pot in one layer, laying on their sides, with enough water to cover them by an inch or so. I use a liberal amount of salt (as much as 1/4 C) and perhaps a like amount of vinegar. The salt raises the boiling point of water; the vinegar keeps the whites at bay should little leaks evolve. Bring the eggs to a rolling boil, cover, remove from heat, and let stand for 15 minutes. Drain, cover with ice and cold water. The more ice the better. Let them stand for an hour or more, then refrigerate overnight (I don’t have to say “after draining off the water”, do I?). I put them in a plastic bag before putting them in the fridge to limit that “egg smell” that my wife so despises.

Peeling the eggs is made a bit easier by banging the eggs around in the sink, gently, for a couple of minutes.

Peel the eggs, halve the eggs, reserve the yolks in a shallow bowl. “Imperfect” whites can be eaten, fed to the dog, or discarded, your preference. On a good day you’ll have 24 halves, on bad day, 18. No matter. (The deviled egg container I have has 20 indentations. I thought that was a stupid number, until I figured out that I routinely screw up two eggs per dozen. 20 is the perfect average number of indentations.)

The filling:

Mash the egg yolks with a fork until smooth. This it the only way. Trust me. The smoother, the better.

Add (you can skip any ingredients that offend you, and compensate at the end)
1 T prepared mustard
2 T hot sauce (Tabasco or your favorite)
2 T sweet pickle relish (Cain’s is the local favorite)
1 T Worcestershire sauce (Lea & Perrins is the best)
1 T cider vinegar
1/2 t salt
1/2 t coarse ground pepper
Miracle Whip ( but not yet)

Mix well, and taste. It might need more salt, or hot sauce. It’s likely too thick. Add 1 T of Miracle Whip, mix, and taste. Repeat adding 1 T of Miracle Whip until the filling is nice and smooth. Spoon about 1 t of filling into each of the egg halves, and garnish with smoked paprika, or a sprig of chive, whatever blows your skirt up. I have been using a 1 qt freezer bag lately. Fill the bag with filling, clip of a small bit of a corner of the bag, and use it to pipe filling into the egg cavities. Neat, clean, far less mess than a real piping bag.

[1] Eggs are also best purchased a week or so in advance. It makes no difference in the flavor, but they are much easier to peel, increasing your final yield.

Corn Chowder

Just kind of whipped this together… It went pretty nicely with grilled-cheese sandwiches.

Bacon (let your conscience be your guide. I used ~1/4#)
1# potatoes, 1/2″ dice
1 medium onion, 1/2″ dice
1 red pepper, 1/2″ dice
1/2# frozen corn
1C half & half
Salt & pepper to taste

Dice the bacon and put it in a soup kettle. Fry it until lightly brown. Drain excess fat.
Add onion and pepper. Cook until tender. [1]
Add potatoes, just cover with water. Bring to a boil, simmer until almost tender.
Add corn, bring to a simmer.
Add cream, season to taste[2], and server with Saltines or oyster crackers.

[1] At this stage, one could mix in 2T of flour and cook for two minutes for a thicker chowder
[2] Despite the bacon, it’s not at all salty.

I’ll be working on this over time.

Grandma’s Apple Crisp

I don’t know who “Grandma” is. Peg never, to my recollection, actually mentioned her. She’s talked about her Pap quite a lot, but I don’t think Peg ever met her Grandmother, at least not her maternal Grandmother. I understand her paternal Grandmother never made Apple Crisp to Peg’s knowledge.

Now, if the recipe had been called “Gram’s Apple Crisp” (and Peggy doesn’t know but maybe the computer autocorrected her…), I’d know it could be attributed to one Ruth Hamel, late of Franklin Maine, who might well be the best cook I’ve ever known. I’ve only eaten her food a few times, but I’ve gone through enough of her jelly and jam to make that proclamation. She was one rarely talented creature in the kitchen, and I was proud to call her “Gram” myself. Now if Gram wasn’t the best cook ever to walk the Earth, that mantle rests squarely on the shoulders of her daughter Teddy, and I’ve eaten a lot of Teddy’s cooking over the nearly 20 years I’ve known her.

So this recipe, whatever its provenance, reminded me on another level of my own Grandma Esther, who was my Dad’s stepmother. I never met his mother, missing her by something on the order of a decade. But I peeled these apples with a knife that is exactly like a couple of knives that my Mom got from Esther back in the 60’s. Not a terribly fancy knife, but it has a sharp, thin blade that is just perfect for sending Macintosh apples to their doom. I was using Cortlands, though, so the knife was just a bit too short for cutting through the center of the apple when quartering them. I peel apples just like my mother taught me – halve, then quarter each apple, then scoop out the core, turn it over and in three quick slices cut off the peel as close as you dare. If you miss a little bit, that’s OK. The peel is where the vitamins are.

Assemble your ingredients:
1 C brown sugar, packed (light or dark, it doesn’t matter)
1 C rolled oats
1 C flour
1/2 C (1 stick) butter, melted
3 C apples, peeled, cored, and sliced (Grandma apparently chopped them – I sliced them, and use Cortlands)

1/2 C granulated sugar
2 t cinnamon

Mix the sugar & cinnamon – set aside

Mix the brown sugar, rolled oats, flour, and butter until it forms a crumbly mixture in the bowl.
Lightly grease or butter an 8-inch baking pan

Evenly spread about half of the oat mixture into the pan.
Evenly spread the apples over the mixture. Sprinkle the sugar and cinnamon over the apples.
Top with the remaining mixture.

Bake in a preheated 350F oven for 40-45 minutes, until golden brown.

Personally, I’d serve it with ice cream in a few minutes.

Now, I screwed this recipe up, and it still came out good. I’m not one to carefully read instructions (my cross to bear, not yours), so I mixed all of the ingredients save the apples together, and put all of the mixture on top of the apples until I checked to see whether I was supposed to dot the thing with butter. Ooops. I also got to three cups of apples about halfway through the second Cortland, so I ended up with about four cups of sliced apples, not wanting to waste anything. Heaven forbid I waste half an apple. So I tried to mix some of the mixture down under the apples, but that left some of the apples exposed. But still, it turned out OK. I think it was a bit on the sweet side, so next time around I think I’ll cut the brown sugar by about half to see where that gets me. I’ll keep the apples at three cups, too.

Lobster Arancini

Each Christmas Eve for about the last decade, Peg and I head over to the house of our friends Jonathan and Karen. Karen is from an Italian-American family, and one Italian tradition for Christmas Eve is the Feast of the Seven Fishes. We don’t always make it to the full seven fishes, but I try to bring along a dish in the theme. I also try to compete with Karen and her three sisters, all of whom are excellent cooks.

My attempt this year was Lobster Arancini – golf-ball sized balls of risotto stuffed with a chunk of lobster meat, then rolled in bread crumbs and deep-fat fried. No, not really the healthiest of treats, but this happens only once a year. It may never happen again because these were a pain to make. But oh, were they good!

I made a double batch, but a single batch is probably manageable. For a single batch (and this follows pretty closely with Giada DiLaurentiis’s recipe, as her recipe came up in my research).

This recipe should make about 16 arancini, enough for 4 servings.

Risotto:
2 T butter
1/2 C finely chopped onion (or shallot)
1 C arborio rice
1/2 C white wine
3-4 C lobster stock (or chicken)
1 C grated Parmesan cheese
1 t salt
1 t pepper

Arancini:
2 C Panko bread crumbs
1 egg
8 ounces lobster meat, in 1/2″ cubes
vegetable oil

Heat the stock to a simmer. Melt the butter and gently saute the onions until translucent. Add the rice and cook for about five minutes. Then add the wine, and stir the rice until the wine is all absorbed. The start adding the stock, about 1/2 C at a time, stirring almost constantly until it is absorbed. After 3 cups of stock is absorbed, check to see whether the rice is tender (al dente). If not, add another 1/2 C of stock, and perhaps another, until the rice is done.

Stir in the Parmesan cheese, and let the risotto cool. You’re going to be handling it.

Beat the egg and combine that and 1/2 C of the bread crumbs with the risotto.

Take 2 T of the risotto mixture and form into a firm ball about 2″ in diameter. Make an indentation in the ball, insert a chunk of lobster, and form the risotto around the lobster to seal it completely. Coat the ball with the bread crumbs as you go, and when you have them all done, deep fry them in 350F oil until golden brown, about four minutes.

Drain on paper towels.

Progressive Scalloped Potatoes

We usually make a traditional recipe (Betty Crocker’s was the base recipe) scalloped potatoes, but I had an odd thought the other night and thought since Peg wasn’t home to pooh-pooh the idea, I went with it, and I was pleased with the results – to the extent that this is going to be my lunch for the coming week.

Heat your oven to 350F

2 # peeled potatoes, sliced thinly (1/8″ is ideal, but if you’re knife challenged, anything smaller than 1/4″ is OK. (Hint – take two slices off one side of the potato, then rest it on the flat side for easier slicing. Nobody cares how they look.
1 small onion, diced
1 cup cubed ham, sliced ham, chopped ham, whatever
2 C frozen kernel corn
3 C milk
4 T butter (divided 3 T & 1 T)
4 T flour
salt & pepper to taste

Slice the potatoes as thinly as you can
Dice or slice the ham into smaller-than-bite-size pieces
Dice the onion quite finely

Grease an 9×13 casserole with some of the 1 T butter
In a heavy skillet, melt the butter, add the onion, and saute until tender.
Add the flour and mix thoroughly, then cook the flour mixture (called a roux) for two minutes over medium heat.
Using a whisk, stir in the milk, continuing to stir completely until the mixture (now a Bechamel sauce) comes to a boil for two minutes and thickens. Take the sauce off of the heat.

Pour a thin layer of sauce into the casserole. Layer half of the potatoes in the casserole, and then layer half the ham and half the corn. Evenly distribute half of the sauce, then layer more potatoes, ham, corn, and sauce.

Dot with butter. Cover with foil, bake for 40 minutes. Uncover, bake for another 60-70 minutes until the potatoes are tender but not mushy.

Serve alone, or as a side for ham or anything else. Excellent as a hot picnic dish. Reheats well in the microwave, arguably with more flavor.

Kenda’s Crock Pot Macaroni & Cheese

This recipe comes from Kenda, Peg’s best friend (probably mine, too), and it gets rave reviews everywhere. We normally make a double batch. Peg has some notes. I have some footnotes.

8oz pkg elbow macaroni, cooked until still firm
12oz. can evaporated milk [1]
1 cup whole milk
1/4 cup butter, melted
2 large eggs, slightly beaten
4 cups grated sharp cheddar cheese, divided 3c/1c
1/4 to 1/2 tsp. salt
1/8 tsp. white pepper [2]
1/4 cup Parmesan cheese grated

In the slow cooker, combine lightly cooked macaroni, evaporated milk, whole milk, melted butter, eggs, 3 cups cheddar cheese, salt and pepper.
Top with remaining cheddar cheese and parmesan cheese. [3]
Cover. Cook on low 3 hours. Watch the pot – one pot’s “low” can burn
the outside and make it like rubber.[4]

Peg’s Note:

I doubled this recipe when I made it to take to a party.
It really doesn’t need the butter. It makes a very rich mac & cheese dish without the butter in it!!

John’s Note:
I once put 1/2tsp of ground mustard into a double batch, but there was no discernible difference. I was hoping for just a little more “zing”, thinking it would play off of the ham,  but didn’t go strong enough.

[1] Original recipe called for 13oz. Evaporated milk comes in 12 oz cans. Don’t kill yourself over detail if it’s not baking.
[2] Really, does anybody still have white pepper? Black pepper works just fine.
[3] Peg normally mixes the Parmesan in with the main ingredients.
[4] Ask John how he knows.

It reheats well in the microwave, too.!